Installation
1) LOCATE AND CONNECT THE SENSOR, APPLY POWER TO THE CONTROLLER
- Connect the remote sensor to the plug-in controller box with the 25-ft telephone cable, plugging both cable ends into the sensor and controller telephone-type connectors.
- Connect your controller into a 120V POWER OUTLET. The display start-up sequence is as follows: bottom bar lights up, then goes up to top bar and back down to bottom bar. Controller is then ready to work.
- IT IS VERY IMPORTANT TO PLACE THE SENSOR CONNECTOR DIRECTED TOWARD THE FLOOR, forming a 180° loop with the 25-ft cable already tied to the sensor top tab (with included beaded tie).
- To VIEW THE AMBIENT HUMIDITY level, rotate the knob counter clockwise. Either DAY or NIGHT indicator will blink on left side of knob to indicate actual light sensor status.
- To VIEW THE AMBIENT TEMPERATURE level, rotate the knob clockwise. Either DAY or NIGHT indicator will blink on right side of knob to indicate actual light sensor status.
2)SET VALUES
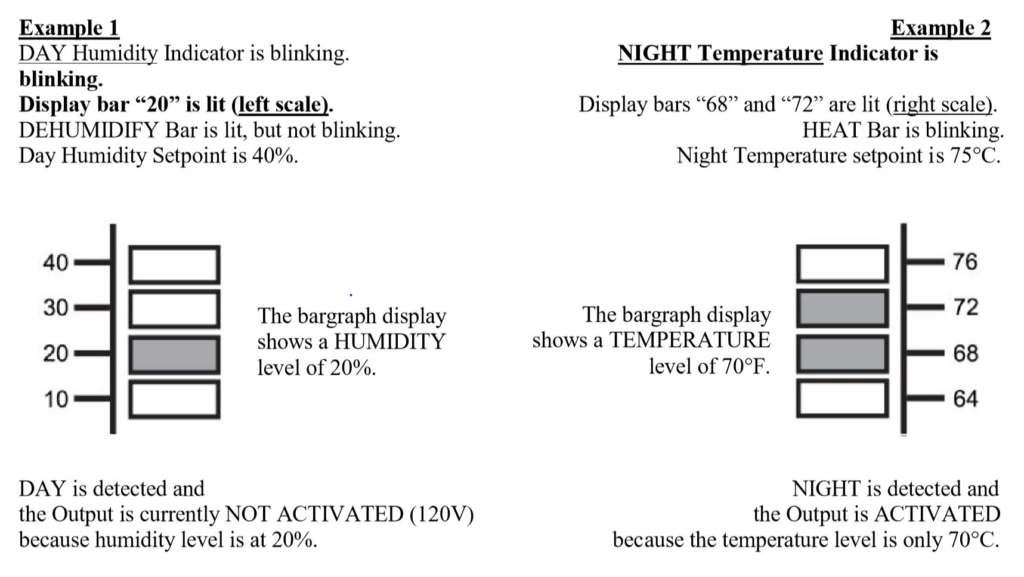
How does the bar display work?
Upper 15 bars show either temperature or humidity values.
The Humidity Scale is located on the left side of the display, the Temperature Scale on the right side.
LOWER 5 BARS SHOW THE SELECTED CONTROL MODE.

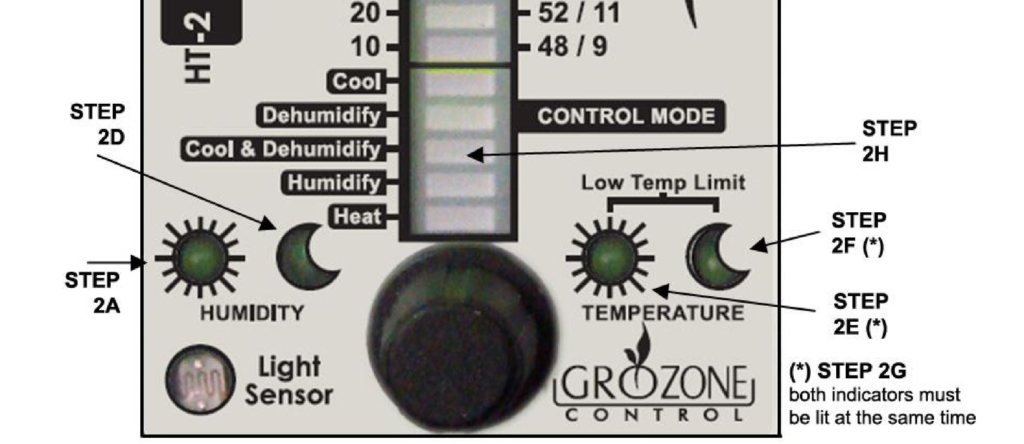
CONNECT YOUR CONTROLLER AND CLICK KNOB TO ENTER THE 6-STEP PROGRAMMING SEQUENCE:
Once you enter the Programming Sequence, LEDs are steady lit. LEDs are blinking when you return to normal operation
| Step 1 | Step 2 | Step 3 | Step 4 | Step 5 | Step 6 | Exit |
| Day Humidity | Night Humidity | Day Temperature | Night Temperature | Low Temp Limit | Control Mode(Note 1) | Return to Control |
Note 1: only one bar lit among lower 5 bars.
| These SETTINGS will ensure proper operation. | |||||
| Operating Modes | DAY HUMIDITY | NIGHT HUMIDITY | DAY TEMPERATURE | NIGHT TEMPERATURE | LOW TEMP LIMIT (NOTE 2) |
| COOL | Setting not used | Setting not used | Day Setpoint: 52°F to 100°F (right scale) | Night Setpoint: 52°F to 100°F (right scale) | Setting not used |
| DEHUMIDIFY | Day Setpoint: 15% to 95% (left scale) | Night Setpoint: 15% to 95% (left scale) | Set value to 50°F or above (Note 2) | Set value to 50°F or above (Note 2) | Set value to 48°F or above (Note 2) |
| COOL & DEHUM. | Day Setpoint: 15% to 95% (left scale) | Night Setpoint: 15% to 95% (left scale) | Day Setpoint: 52°F to 100°F (right scale) | Night Setpoint: 52°F to 100°F (right scale) | Set value to 48°F or above. |
| HUMIDIFY | Day Setpoint: 15% to 95% (left scale) | Night Setpoint: 15% to 95% (left scale) | Setting not used | Setting not used | Setting not used |
| HEAT | Setting not used | Setting not used | Day Setpoint: 52°F to 100°F (right scale) | Night Setpoint: 52°F to 100°F (right scale) | Setting not used |
Note 2: The Low Temperature Limit will stop your dehumidifying equipment if the temperature in the room cools down below this setting to avoid damaging your plants. This limit is active ONLY when “DEHUMIDIFY” or “COOL & DEHUMIDIFY” CONTROL MODE is selected. Always set your DAY and NIGHT temperature settings NOT MORE THAN 2°F above the Low Temp Limit.
3)CONNECT YOUR EQUIPMENT (120V 15Amps MAX)
Connect your equipment into the 120V outlet on the front of your controller, set your values and control mode, then you’re set!
- FAN (to COOL, COOL & DEHUMIDIFY or DEHUMIDIFY)
- HUMIDIFIER (to HUMIDIFY)
- DEHUMIDIFIER (to DEHUMIDIFY)
- HEATER (to HEAT), 1000W heater recommended to maximize product service life.
During the normal operation, LED or bar indicators will blink in the special conditions:
BLINKING INDICATORS (only one blinking at a time):
The blinking indicator tells you which of temperature or humidity is currently shown and which of day or night period is being detected by the light sensor.
E.g. A Blinking Humidity Sun Icon stands for “Display currently shows Humidity value” and “The controller currently works during a Day Period”.
BLINKING TEMPERATURE OR HUMIDITY BARS:
The temperature or humidity values are indicated by the upper 15 bars of display.
- Temperature reading: TOP BAR is blinking when temperature is above 104°F / 40°C. BOTTOM BAR (of 15) is blinking when temperature is below 48°F / 9°C. Otherwise, temperature is within these 2 limits.
- Humidity reading: BOTTOM BAR is blinking when humidity is below 10%. Humidity above 100% is impossible, TOP BAR will never blink.
- Temp sensor failure: both TEMPERATURE TOP and BOTTOM BARS are blinking when the temp sensor reading is invalid. The Output will be held OFF if the control mode is using this sensor. Unit may need to be repaired.
- Humidity sensor failure: both HUMIDITY TOP and BOTTOM BARS are blinking when the humidity sensor reading is invalid. The Output will be held OFF if the control mode is using this sensor. Unit may need to be repaired.
BLINKING CONTROL MODE BAR:
The selected CONTROL MODE is indicated by one of the lower 5 bars of display.
- Output is OFF (no voltage on output): Control Mode bar is STEADY LIT, not blinking.
- Output is ON (120V on output): Control Mode bar IS BLINKING.

DAY AND NIGHT DETECTION
The light sensor detects a NIGHT condition when it senses darkness for a minimum period of 8 seconds.
The light sensor detects a DAY condition when it senses light for a minimum period of 8 seconds.
ELECTRONIC BALLAST IN THE SURRONDINGS
Electronic ballasts are generating electronic noises (EMI) that are likely to be picked up by the sensor cable and alter the reading of the temperature and humidity values. The HT-2 incorporates built-in filters that reduce the effect of EMI, however, we recommend:
- to place the sensor and cable as far as possible of the ballast, the bulb and the cable between them,
- to connect the controller on a different 120V outlet / circuit than the one used for the ballast.
Troubleshooting
1) BEFORE YOU START
***** CAUTION: READ AND FOLLOW THESE INSTRUCTIONS BEFORE STARTING THE TEST.
- LIGHTING: Perform this test in a room with enough light for the controller to detect a DAY condition. A dark location should be avoided.
- You will need a lamp or night light to perform the test.
- Perform the test in a room temperature around 25°C / 78°F
2) TEST
| STEP | ITEM | HANDLING AND TEST DESCRIPTION | EXPECTED RESULTS |
| 1 | LEDs check | -Plug in the controller into an electrical outlet | The LEDs will light ON from top to bottom and bottom to top, one LED at a time. |
| 2A | Display & knob check | -Push the knob once. | The unit enters in DAY HUMIDITY SET POINT and the HUMIDITY DAYTIME LED turns ON (sun on the left side). |
| 2B | -Turn knob clockwise to raise set point to 95%. | The display bars will light up from the bottom and up to the top, no more than 2 bars simultaneously. | |
| 2C | - Turn knob counter clockwise to lower set point to 15%. | The display bars will light up from the top and down to the bottom, no more than 2 bars simultaneously. | |
| 2D | - Push the knob once. | HUMIDITY NIGHTIME LED turns ON. | |
| 2E | - Push once and turn the knob counter clockwise to set the setpoint to 60°F. | TEMPERATURE DAYTIME LED turns ON. | |
| 2F | - Push once and turn the knob counter clockwise to set the setpoint to 60°F. | TEMPERATURE NIGHTIME LED turns ON. | |
| 2G | - Push the knob once. Set to56°F | Both TEMPERATURE DAY & NIGHT LEDs turn ON. | |
| 2H | - Push the knob once | All The LEDs and display bars turn OFF. The CONTROL MODE LED turns ON. |

| STEP | ITEM | HANDLING AND TEST DESCRIPTION | EXPECTED RESULTS |
| 3 | Output check | - Turn knob in both directions to change control mode. - Select “Cool control mode. - Push the knob once. |
The LEDs will turn on one at a time in the CONTROL MODE section. The Output will turn on. (Test with a nightlight in the output) The unit is back to normal operation. |
| 4A | Sensor Check | - Disconnect the sensor from the controller. - Reconnect the sensor to the controller |
The top and bottom display bars will blink. The unit is back to normal operation and both bars turn off. |
| 4B | - Blow into the sensor | The display bars will go up to indicate that the temperature and humidity levels are going up. | |
| For Step 5, you will need a reference thermometer or hygrometer to validate the sensors readings (values). | |||
| 5A | Photocell and room condition check | - Turn knob clockwise. | The DAYTIME TEMPERATURE LED blinks and the temperature level should read between 64°F and 84°F (Room temperature). |
| 5B | - Turn knob counter clockwise. | The DAYTIME HUMIDITY LED blinks and the humidity level should read between 30 and 60% (humidity level in the room). | |
| 5C | - Cover the photocell for at least 8 to 10 seconds. - Turn the knob clockwise. - Turn the knob counter clockwise. |
The NIGHTIME TEMPERATURE LED blinks and the temperature level should read between 64°F and 84°F (Room Temperature). The NIGHTIME HUMIDITY LED blinks and the humidity level should read between 30 and 60% (humidity level in the room). |
|


